One essential feature that ensures effective communication is the Spell checker. However, enabling the spell checker on your Android phone can add to your writing credibility.
A writing tool like Spell Checker acts as a safeguard against embarrassing typos and spelling errors, thereby enhancing the accuracy and professionalism of your written communication.
If you find yourself struggling to make the most of this tool, in this article, you’ll learn how to enable and utilize the spell checker on your Android device through Settings.
How To Enable Spell Checker on Android Phone Using Settings
Using your Android phone Settings app, enabling a spell checker is just an easy setup that won’t take time to achieve. Although, I have provided guidelines in simple steps to enable the Spell Checker.
Step 1: Open Settings App
Navigate to Settings and open the app. Scroll down to find and select the System or Additional Settings option, depending on your device version/manufacturer.

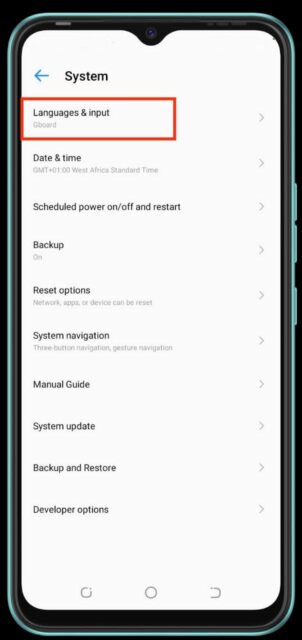
Step 2: Select System/Additional settings
When you select System or Additional Settings, tap on the Language & input option.

Step 3: Tap Language & input
Once you’ve opened Language & input, select Spell Checker from the options.

Step 4: Select Spell Checker
After you’ve selected Spell-checker, toggle on the switch next to this option to enable it.
Once you’ve successfully enabled the spell checker on your Android device, endeavor to maximize its utility.
Conclusion
With just a few settings adjustments and conscious utilization of the spell checker feature, you can significantly reduce typos and errors.
The spell checker might seem like a small feature, but its impact on the clarity and correctness of your written content is substantial.
However, by enabling and effectively using this tool on your Android device, you can elevate the quality of your communication, ensuring that your messages are error free and professional.


